|
Often the standard (push/pull flex tab) opening works fine and suits my needs; however, sometimes I wished I had a real simple second entrance with a removable plug... or a round hole that would work with a piece of queen excluder to tape over it... or even better a dial-an-opening entrance wheel/dial that could be rotated to various position/settings to vent, exclude queen, full open, etc.
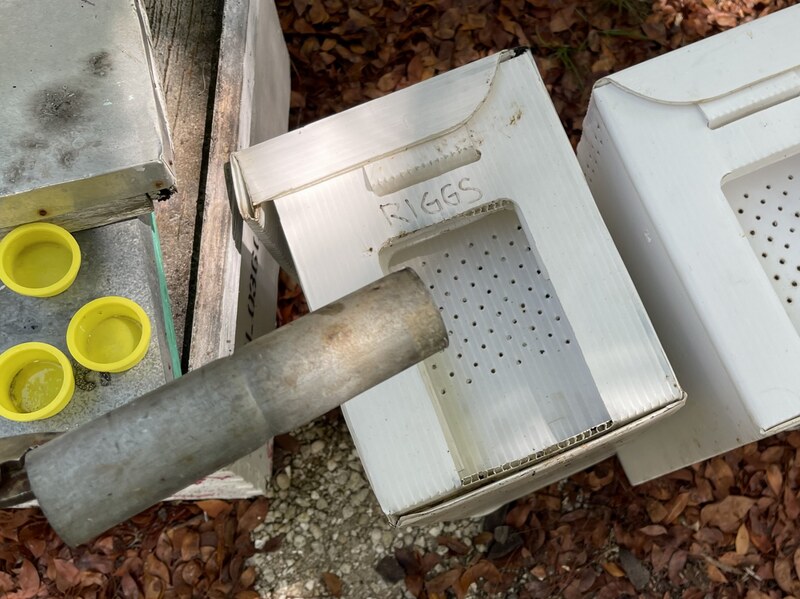
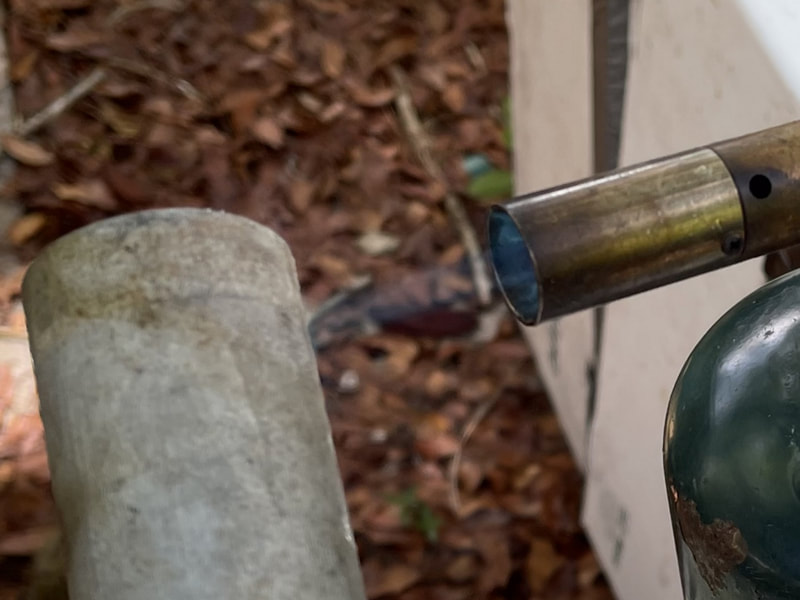
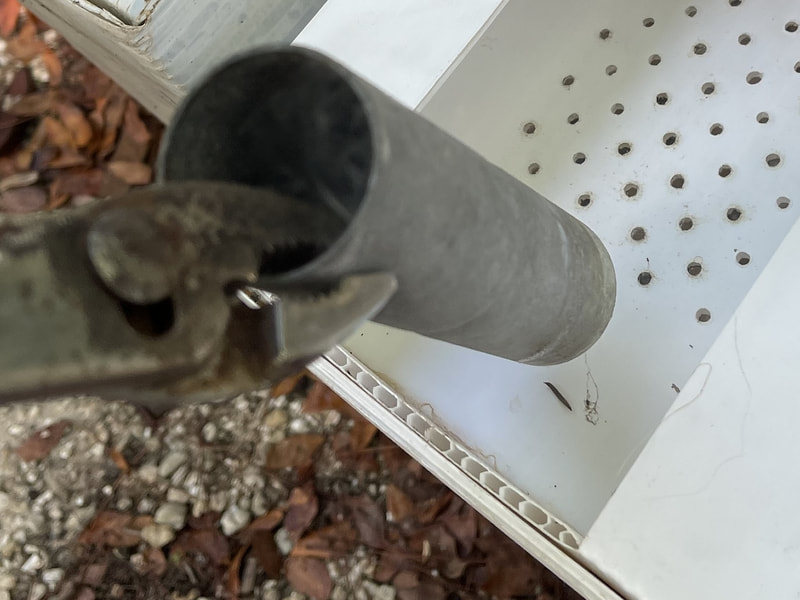
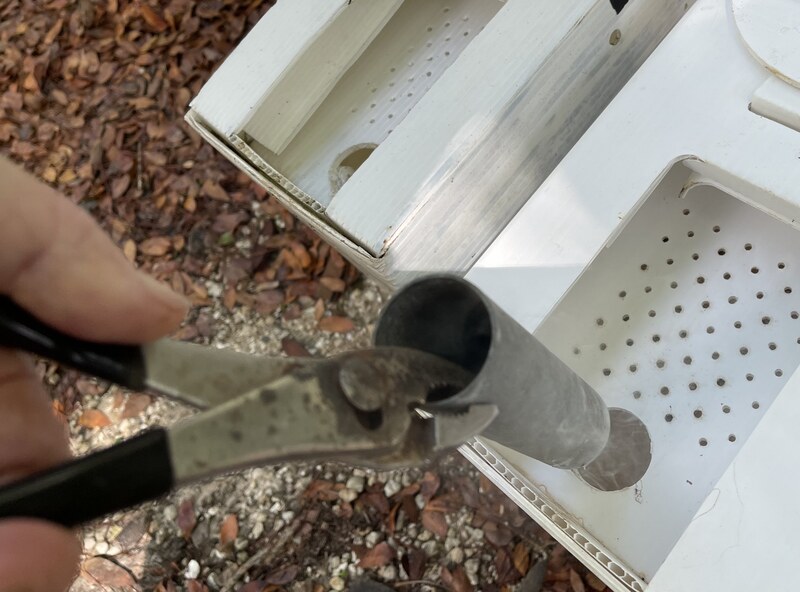
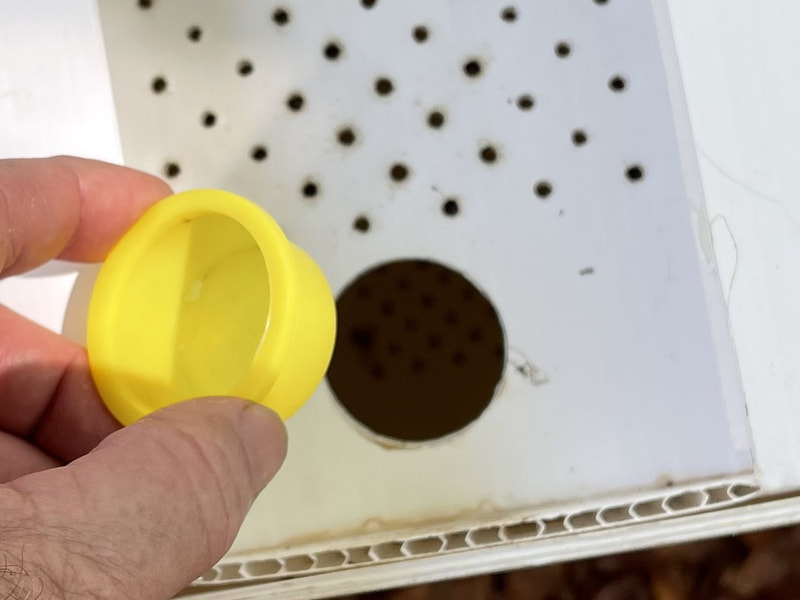
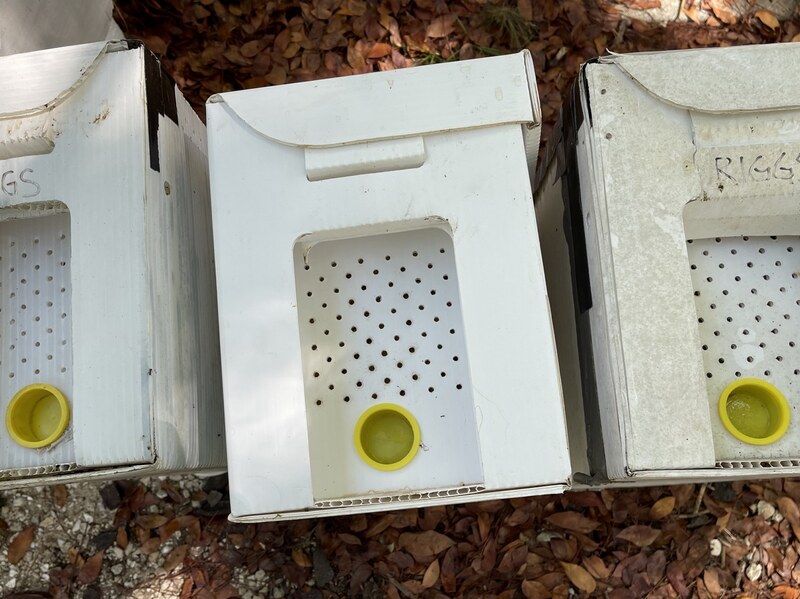
PROBLEM: Didn't like trying to drill into corrugated sign-board plastic with standard spade bits and risk possible chatter, burring, or worse. Or trying to find my hole saw and running it backwards to make smooth hole. SOLUTION: I had some of the 1 1/2" dia. yellow plastic nuc plugs that come from bee equipment supply companies (often used in the entrance of waxed cardboard nucs). Chainlink top line rail pipe is 1 3/8", but the coupler/connector had the O.D. that worked perfectly. Heated the connector for about 15 to 20 seconds and used it to make a nice smooth hole in the plastic nuc (opposite end from standard entrance. Now I can use either or both entrances. Queen exclude the round and close the standard push/pull entrance, then later open the standard entrance back up and/or plug the round entrance. WARNING: Pipe is hot, do not touch with bare hands. I used pliers, but assume welding gloves would work.
0 Comments
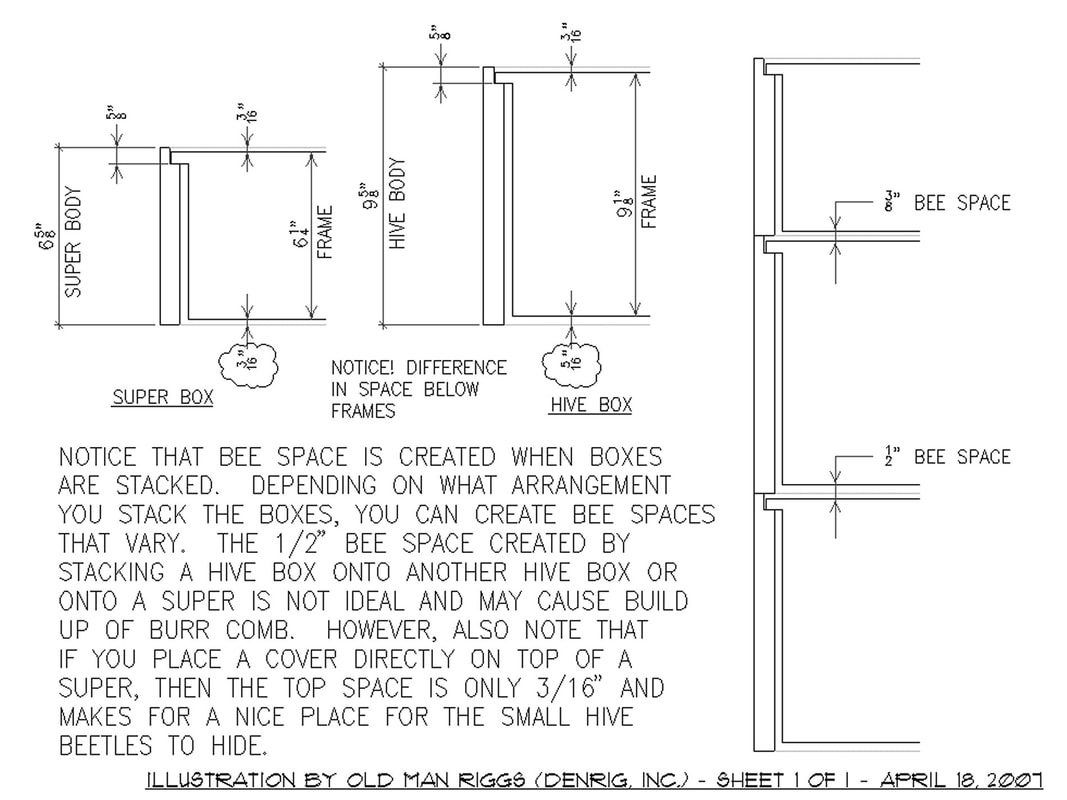
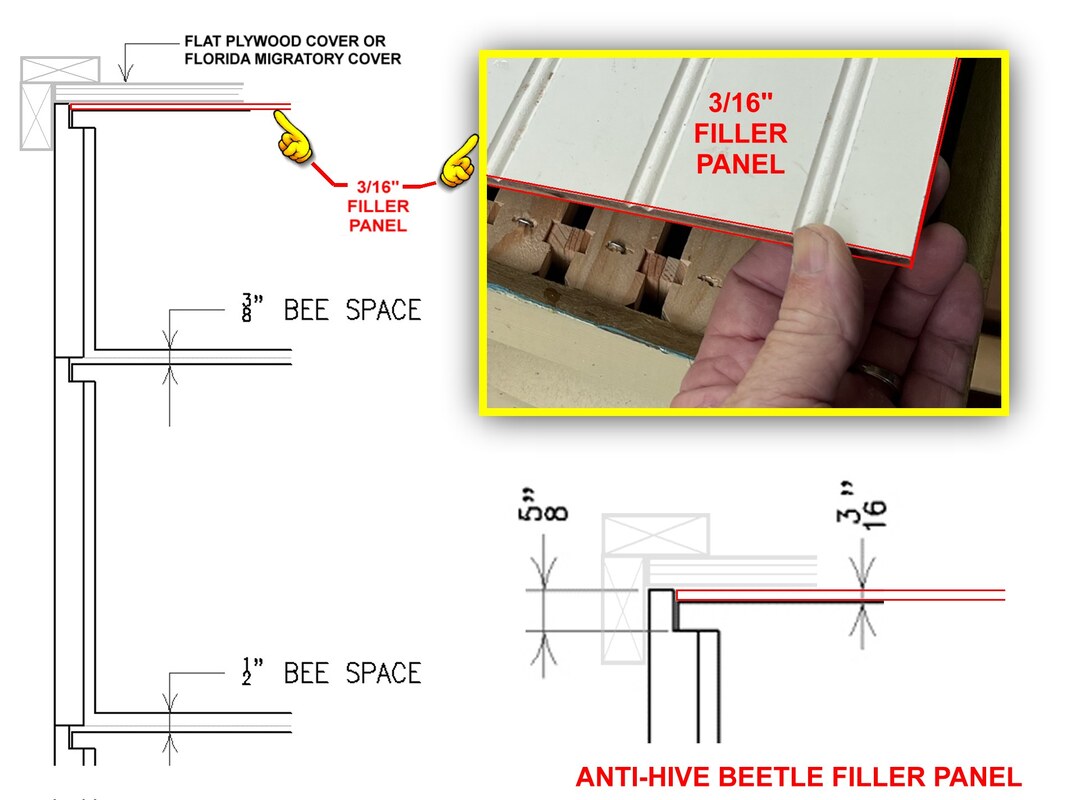
As you can see from my sketches below the 3/16" space above the top bars of frames has been a concern of mine for over 14 years. Why? Primarily due to notices accumulations of hive beetles which scurry when I left off the cover to my hives. Hive beetles shouldn't be able to escape the bees. Often after removing the cover, the bees would quickly begin chasing the beetles which they weren't able to reach until I lifted the cover.
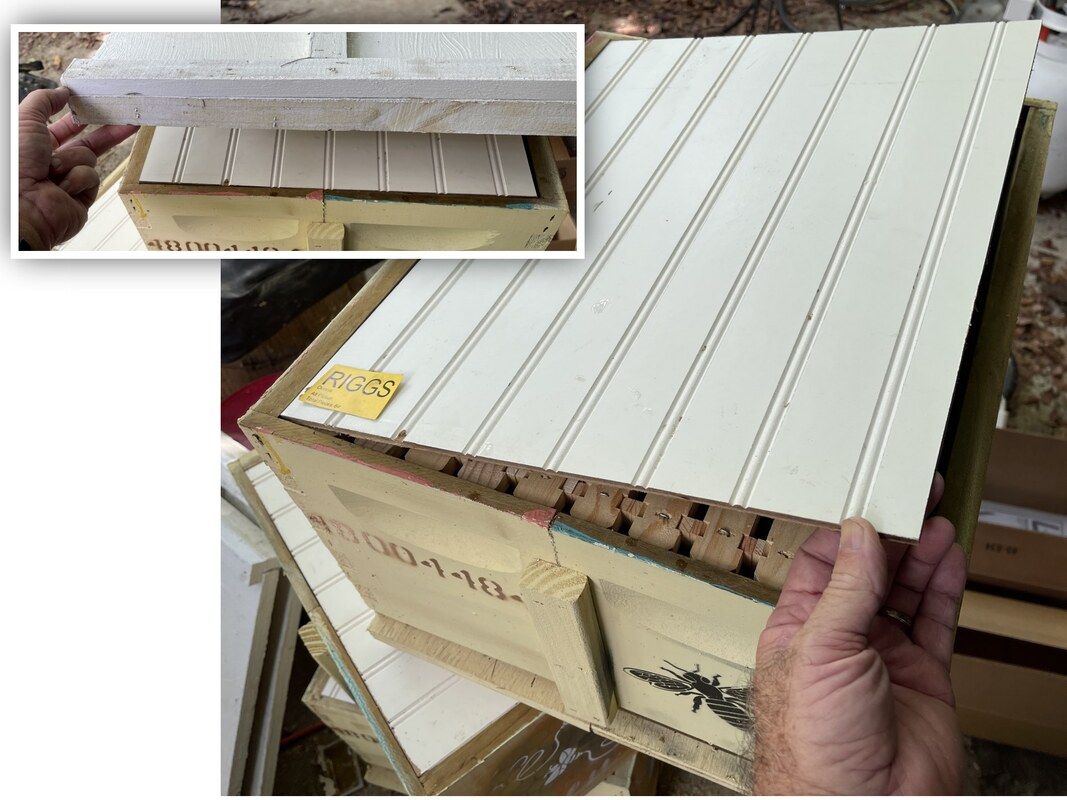
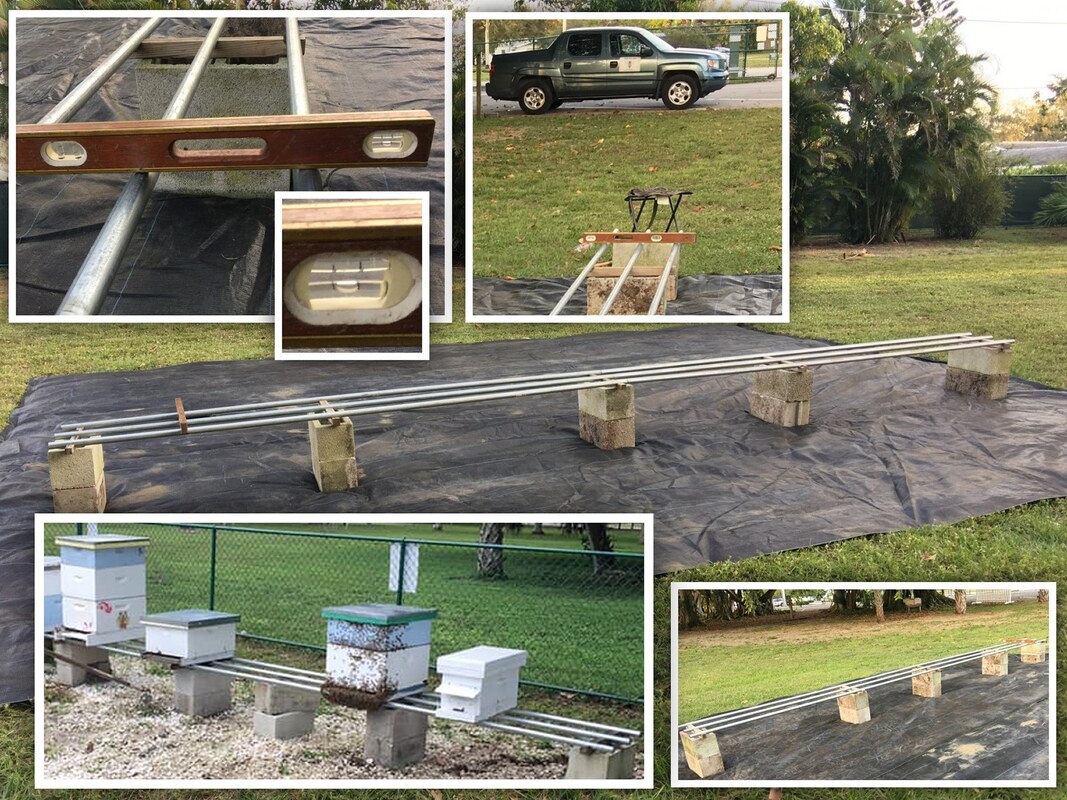
I guess there are two ways to approach the 3/16" space. Down here in South Florida we do not use inner covers. In the absence of inner cover and the common practice of using 3/4" plywood or migratory covers as top covers this leaves a 3/16" space. A bit too tight for most bees to squeeze into to chase pests or for whatever reason they may need access. One approach is create a larger space... just a slight increase to cause it to be 1/4" or 5/16", but really not 3/8" otherwise more burr comb and frames sticking to top cover. This could be accomplished in hive cover design, spacer shims, etc. (not going to think about it now... another day). A second approach is to reduce the space to the point hive beetles cannot access it. This is where I will focus today. Having also used top bar hives (KTBH & TBH) from time-to-time I noticed that my weather/rain cover actually fit tightly against the top bars, not to mention that bees did not access the area above the top bars due to the design of the hive (no spaces between the tight-fitting top bars). Why not have such a cover or inner panel to fit tightly on top bars and eliminate the beetle space? I am going to test 3 of my hives using the 3/16" panel. I used panel bead board which I found to be reasonably stable on top bar hives... plus I had some on hand. I guess you could use other panels... or even Plexiglas. Goal is to keep top bars free of hive beetles and forcing any hive beetles to expose themselves where my bees can trap/jail (propolis them in) them. We'll see how it goes.... or if I need to make modifications, improvements, re-design, or abandon this for another decade. I came up with a pipe stand system and have been using it for over 10 years now. I've used it in my home apiary and two or three of our bee club apiaries. I came up with it because of research mixed with theories and a bit of common knowledge of insect pests. Plus a need for something that expands easily and can be quickly broken down and stored in small space or transported to new location.
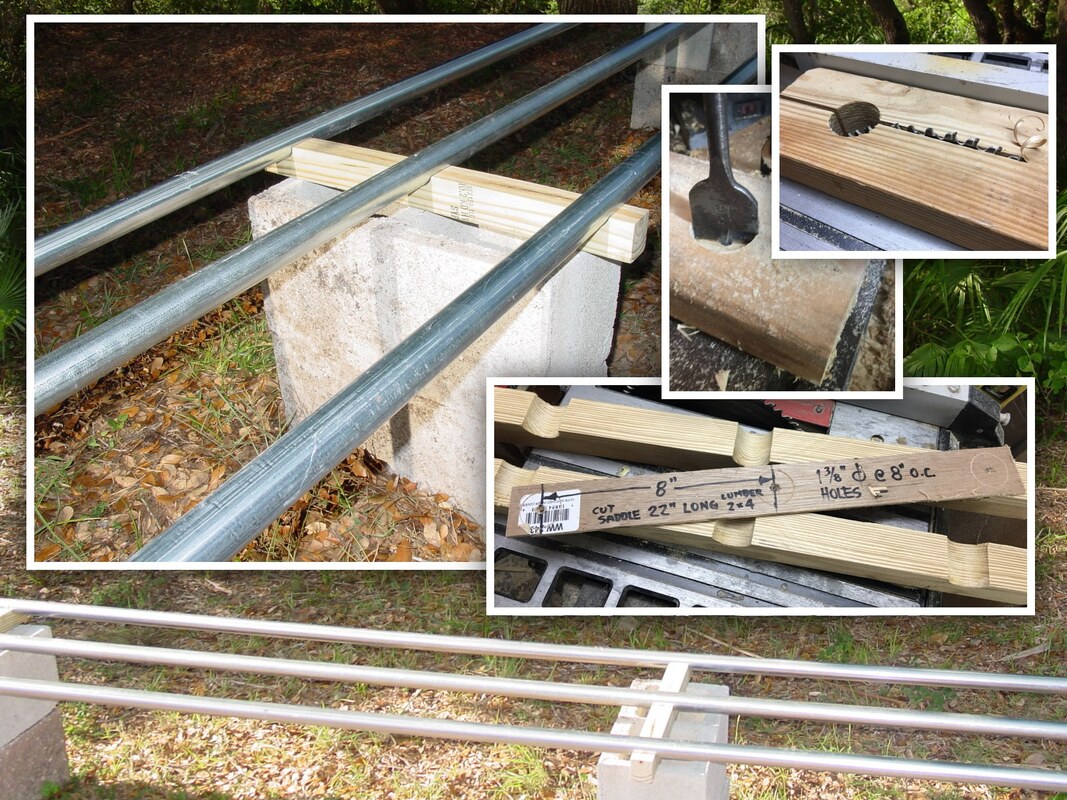
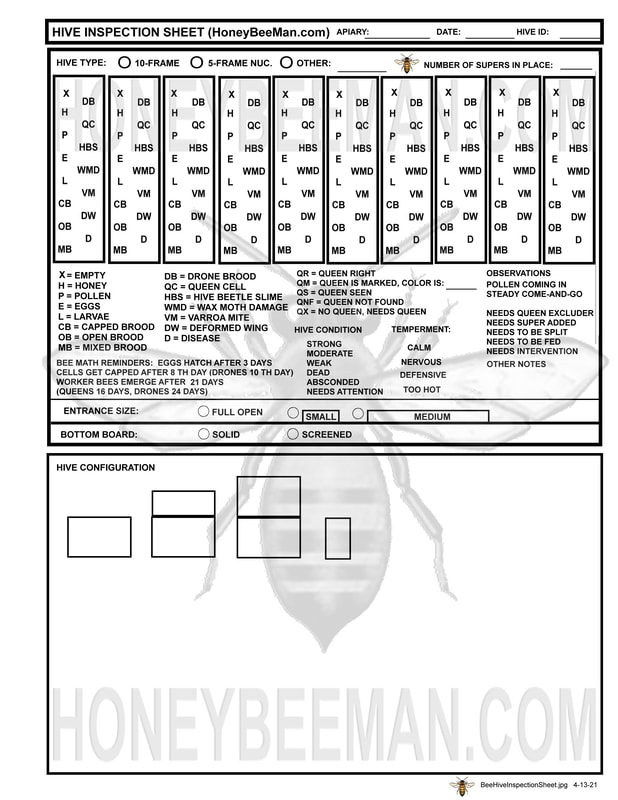
Stand consist of wooden saddles (drilled and split from 2x4). Treated lumber has lasted over 10 years. I also use ordinary 2x4 and replace after a few years. Three runs of standard 10-ft sections of top rail (1 1/4" galv.) chain-link fence component. Pipe has swaged ends should you wish to expand length beyond 10 feet yet look and appear continuous and uninterrupted. Benefits: Sliding: galvanized round pipe has very little contact area (less resisting friction) with bottom of hive bottom board and allows easy sliding of hives to left or right when doing splits or doing gradual respacing to spread hives apart or closer. \ Insect Obstacle: Round hot pipe also tends to cause ants difficulty in traversing hot round path. to the hive.. plus if they leave their standard scent trail it easily washes off with a few rains or a wipe down, whereas wood usually provides a straight flat path where the ants mark a trail that soaks into the wood and makes it easy for them to follow paths on a more permanent basis. Some of this is theory or my own thoughts, but I don't have ants crawling up my stand to the hive like I did when I used wooden stands... or even stands where bottom of hives were sitting directly in contact with cinder blocks (creating voids or spaces to hide). Assembly: No nailing or screwing. Lay saddles on top of the double stacked cinder blocks and lay the pipes in the cupped out saddles. Easy to add more supports or more saddles to reduce span for extremely heavy hives. I find that four supports at 3'-4" o.c. is adequate. If you want to be safer then five supports @ 2'- 6" o.c. is more beefed up. Shimming: to get a slope of 1/8 to 1/4" to entrance, just shim back ends of saddles and check with a level. I find that a 1 3/8" spade bit is the perfect size for the 1 1/4" chain-line top rail post (sold in 10-ft sections at Lowes, Home Depot, etc.). I put together this Beehive inspection sheet today. It is easy for me, because I had already used many of this abbreviations when jotting down comments. I now typically don't have time to even write out the abbreviations, so I use this to just check, tick, highlight, circle, etc. the abbreviations. I've also sometimes found a need for recording "frame-by-frame" inspection results, so this sheet I made with 10 frames, each with popular abbreviations, so I get a better record of what the hive looked like a week or so later after I've forgotten. 10 frames are there, but you easily "X" or scribble off a couple of frames if 10 frame... and so forth for 5-frame nucs, etc. Besides the abbreviations, I also use some short-cut Q-code abbreviations (schedule/legend below the frames section) for queen status (QR, QM, etc.), plus other easy tick/check/circle for hive, condition, temperament, needs, observations. Often I and possibly some others have memory lapse when doing bee math to assist in reading of the frames, so I included reminders of dating the frame by using bee math. I also find myself asking myself about the entrance setting and even the type of bottom board. This is a first attempt. I'm sure I'll find other things that I wish I could just check off without having to actually write it out. There is a slight learning curve, but the abbreviations are pretty simple, once you start using them.
This post does not deal with local (South of Orlando) sources but typically will be limited to very North Florida, Georgia, Alabama, Hawaii, California, etc. where beekeepers can purchase queens from older, established (with a history), proven queen breeders who have developed their own line of bees (some for over a hundred years and/or 4 generations in the business) and have taken great pains to develop lines of queens with sought after desirable traits (i.e., rapid build up, prolific, gentle, surplus honey building, tight brood patterns, easily stimulated when fed, less swarming, disease resistance, pest resistant, hygienic, known genetic origins and controls/testing for quality assurance, etc.). This is not meant to say you will not be happy with your mutts (water meter, birdhouse/owl box, and homegrown queens), but just offering information here for those that have personally asked about where to purchase something else... an alternative to local SW Florida queens for whatever reasons. If you know any specifics of Queen suppliers listed here or those not listed here (which fit the thoroughbred/jaguar/elite/superhero criteria), please share your experiences with those those queens and their suppliers. Personally my best queen ever came from Dan Purvis of Purvis Bros. years ago. I understand their Georgia operation shut down (7 or so years ago) or maybe moved farther away... and I haven't tried their queens since. I have used both Koehnenm, Kona, and Rossman, so I'll start with those 3 in this post. I haven't been nearly as impressed as I was back in the day with Purvis Bros queens. If you are impressed with some queens, let me know why (the details and specifics, where to buy). Please share in a comment to this post for the benefit of others. The Koehnen family (California) has been beekeeping since 1907. Over the years they've grown to be one of the largest honey bee and queen producers in the world. Typically they will produce queens from April into early summer (June or July), depending upon the season. They begin accepting orders for queens (and package bees) in early January. Queens (& Packages) are available beginning in April. Their Cordovan Italian (I call them my Golden Girls, because they are light colored) is the primary queen of interest (in my opinion) that they produce. They also produce Carniolan queens (more of a Northern States bee for colder climates and known for their "overwintering" abilities.) Their Cordovan (which I have used in the past) are said to be "very prolific, they are known for their rapid spring buildup and they are extremely gentle. They are proven to be very hygienic." Kona supplies Italian or Ligustica queens (the most popular in the world). Kona Queen Breeder Queens and Drone Mothers are chosen from top commercial honey producing colonies. A quality line of bees developed over many years under commercial conditions from a company that is constantly striving to offer the best quality. Because of their Hawaiian weather patterns and location of their mating yards, they produce queens on a more reliable schedule than anyone in the business. These production-proven queens must not only be the top producers, but must pass other stringent tests regarding resistance to diseases, temperament and honey-producing qualities. Their Italians produce large frames of brood, in a tight patterns, are excellent honey producers and not likely to swarm. A little bit about their history which goes back to 1936 when Mr. J. G. Rossman, known as “Mr. Joe”, progressed from helping a nearby beekeeper, gaining knowledge and experience about bees and forming a partnership, Rossman & Long, with a gentleman from Ohio who each year wintered his bees in South Georgia and supplied customers in the northern states with packaged bees and queens for use in the production of honey.
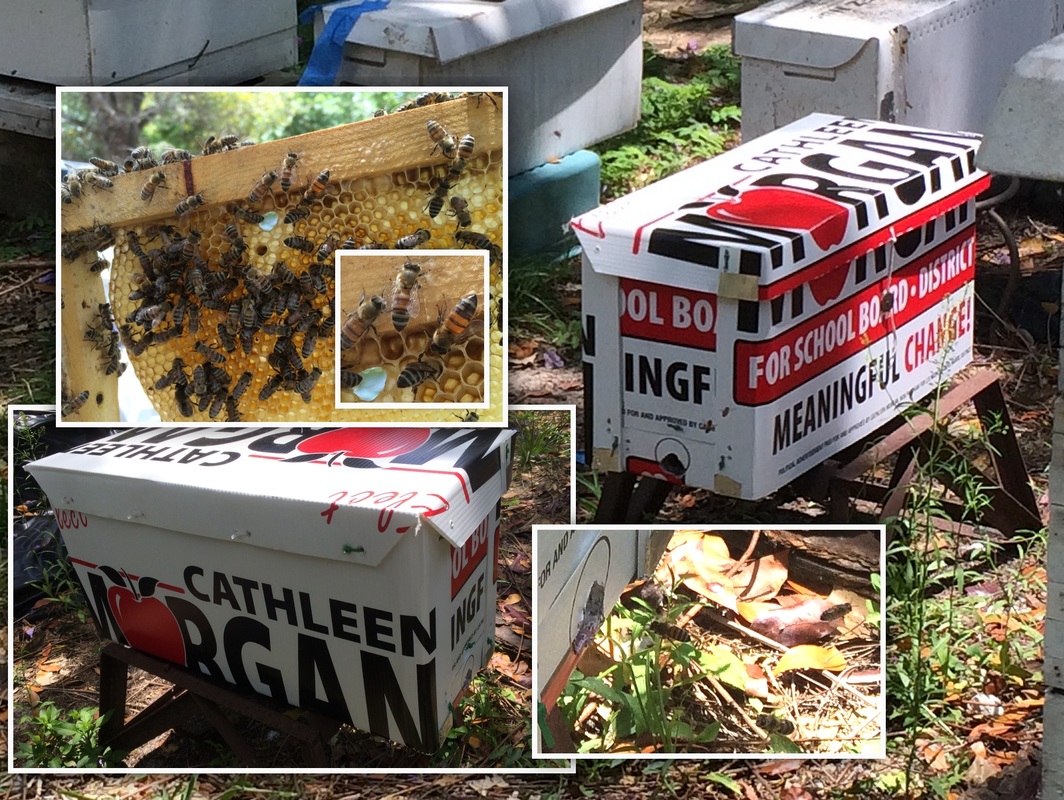
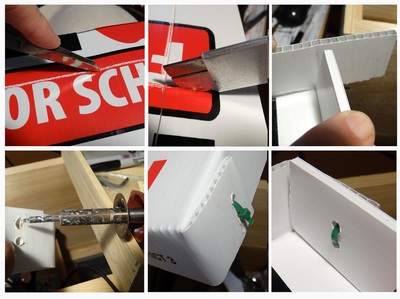
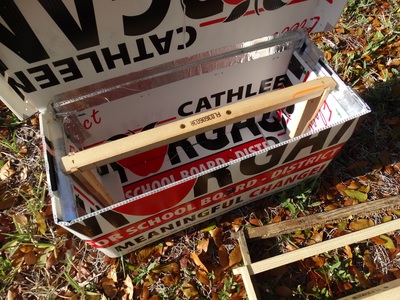
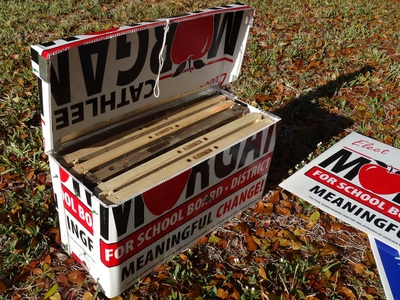
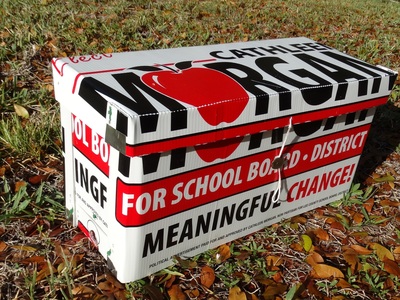
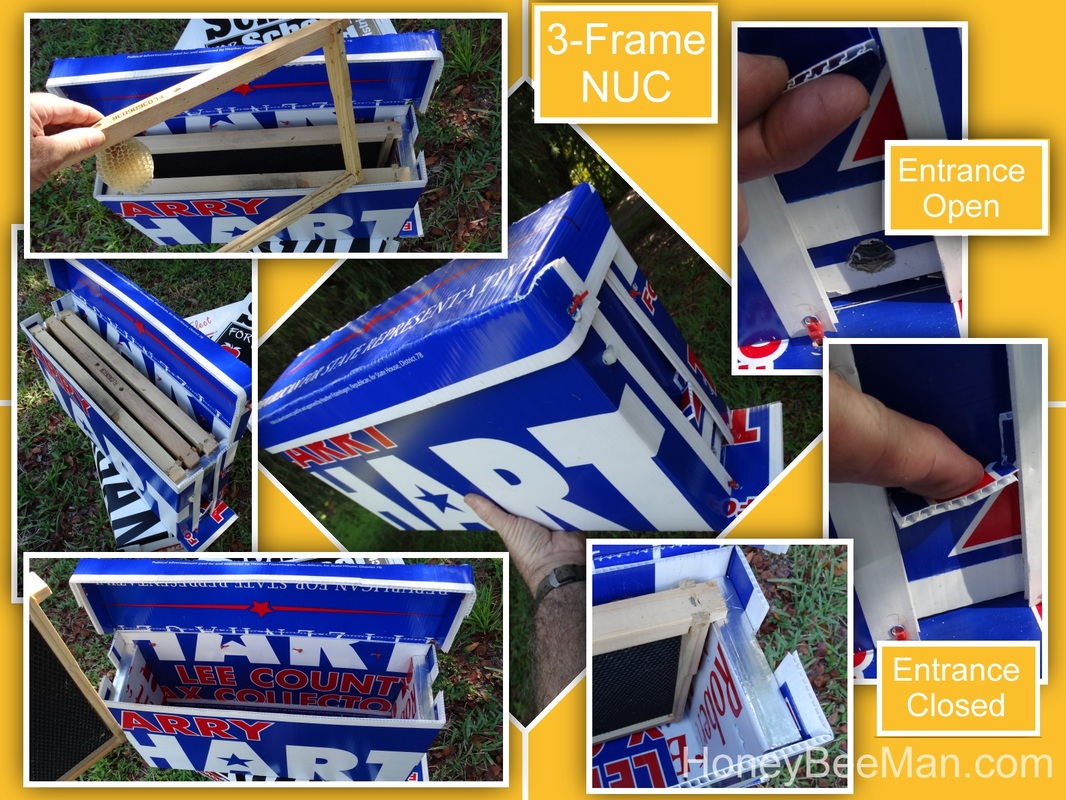
In 1952 the partnership was severed and the business became known as Rossman Apiaries. In the late sixties the company was incorporated by Fred and Phillip Rossman. Mr. Joe has since passed away, and Phillip has retired. Fred and his wife Ann now own and operate the business. At the time of this post (May 25, 2020), I have ordered 4 of their queens which will arrive in a couple of days and I'll see how things go. Don't want a heavy wooden nuc or just want the fun of recycling/re-purposing something that ends up at the recycling plant? Make these light-weight 5-frame nucs from political signs (or other) after they are no longer useful for their original purpose. You may see some metal duct tape in these photos, but primarily the purpose of the duct tape was to hold a hinge or corner in place while I burned holes and zip-tied it solid. I left the tape there, but could have removed it. However, metal duct tape is good if you wish to seal a seam or join panels that are too small to allow folding of all corners and bends. This is my first prototype. I will be making improvements on then second one I make. You can modify these to suit your purpose... add porches, nuc entrance dials, landing pads, or however you wish. I chose a hinged lid, you can just make a separate/loose lid, etc. etc. If you have ever seen old political signs discarded, you will notice that they hold up very well to the elements and probably will last as long as unpainted or painted wooden nucs.
On this 3-Frame version I left a little bit of a landing flap at entrance end.. plus I made a little slide gate to close off (or open) the entrance hole.
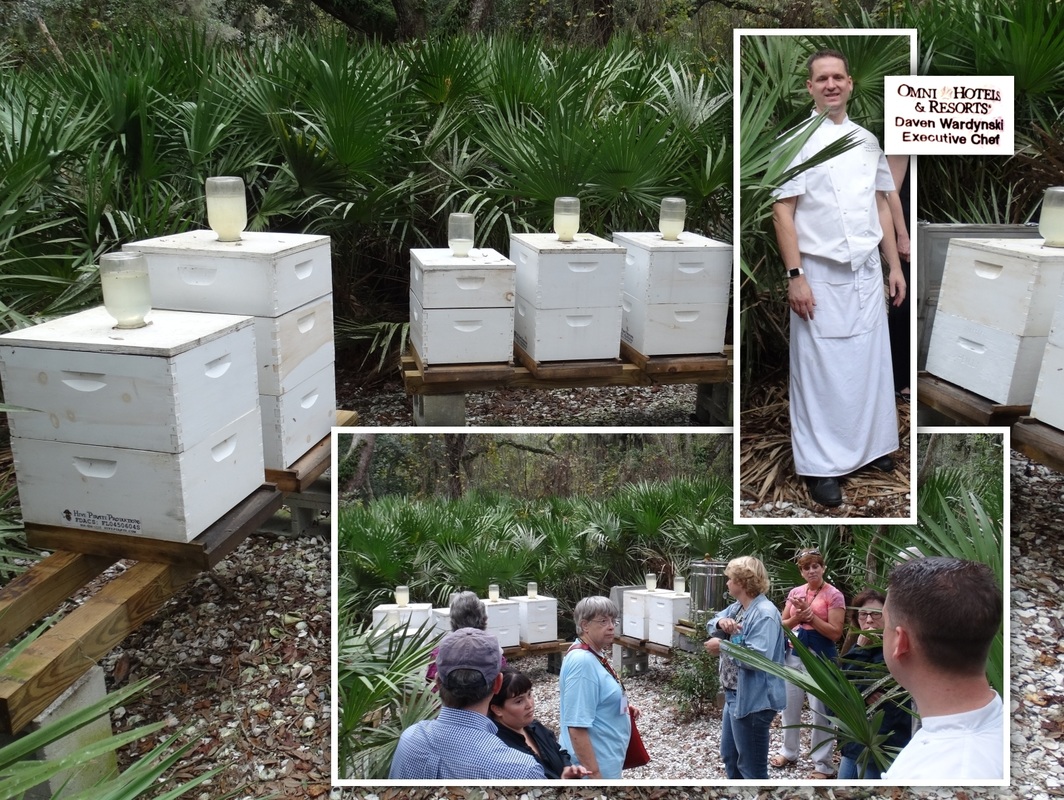
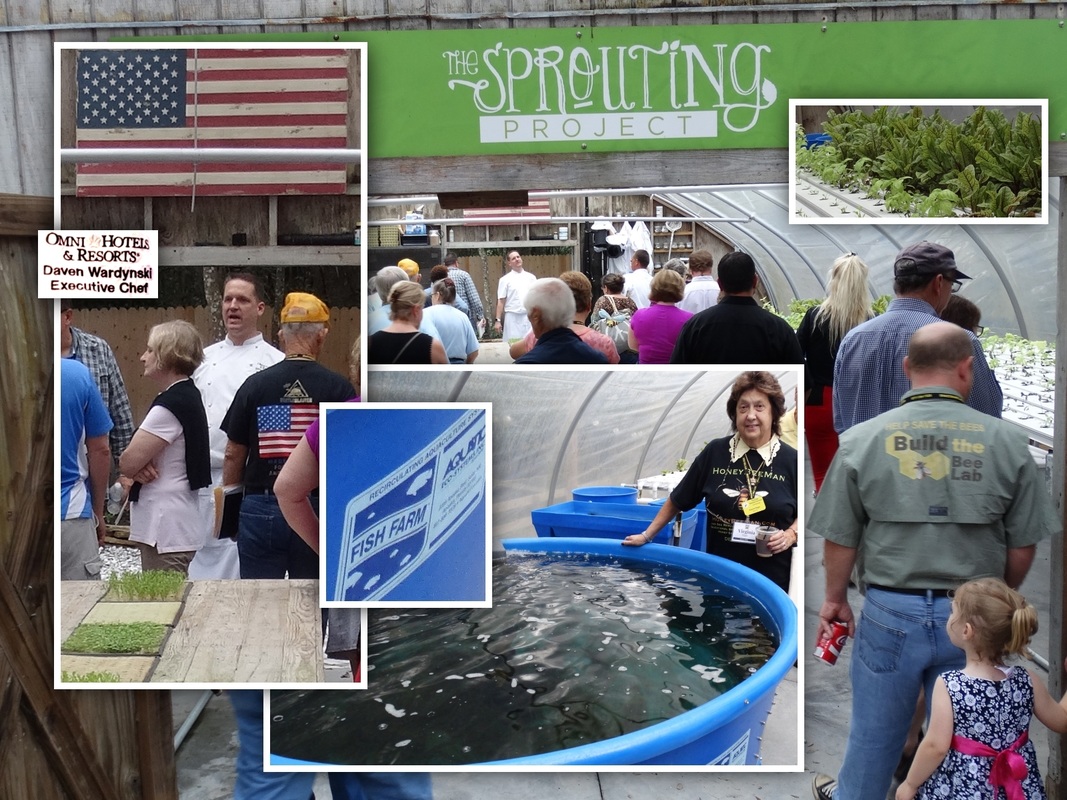
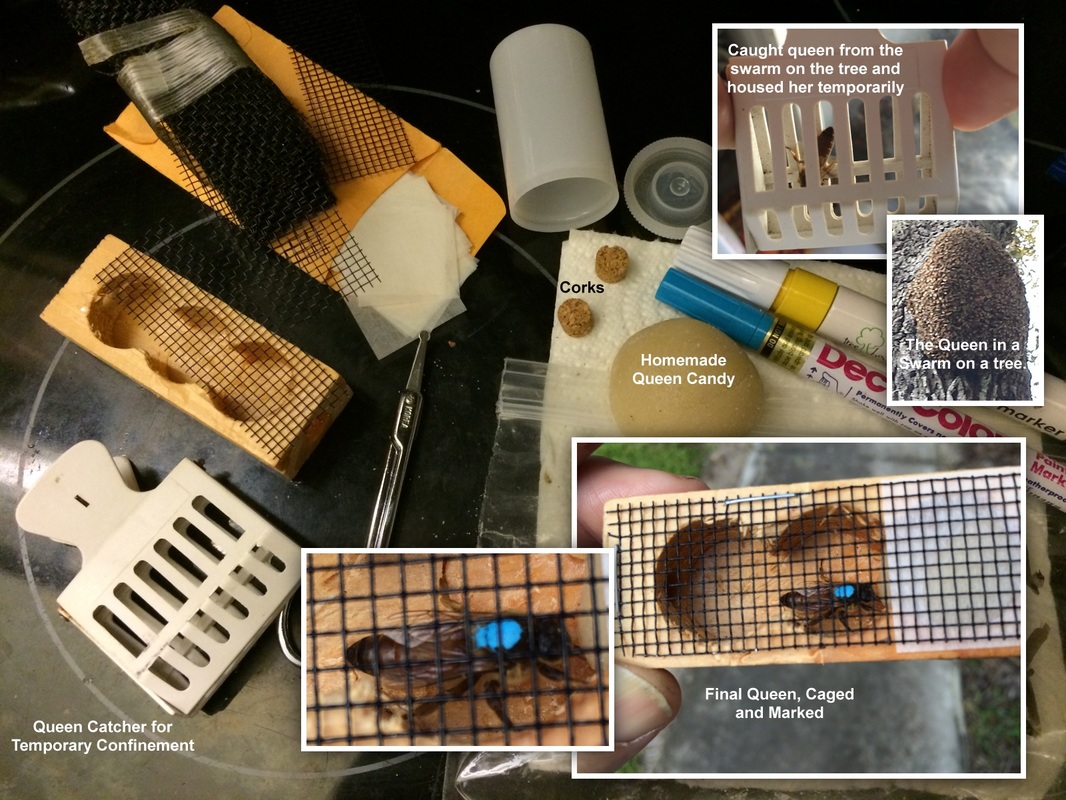
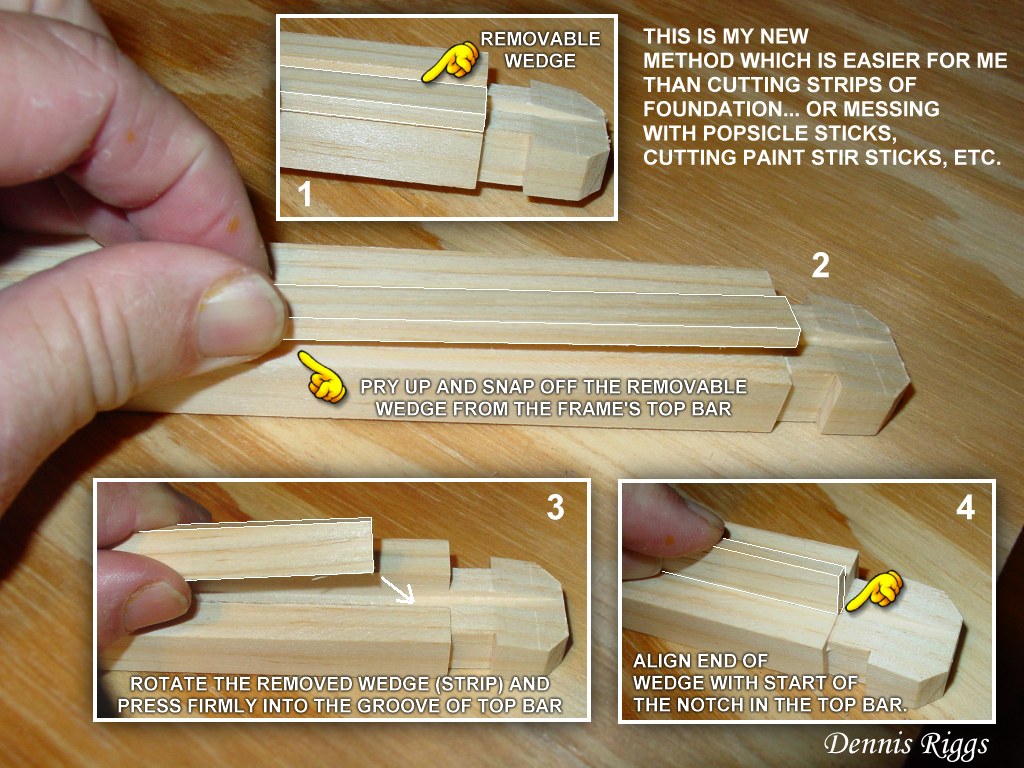
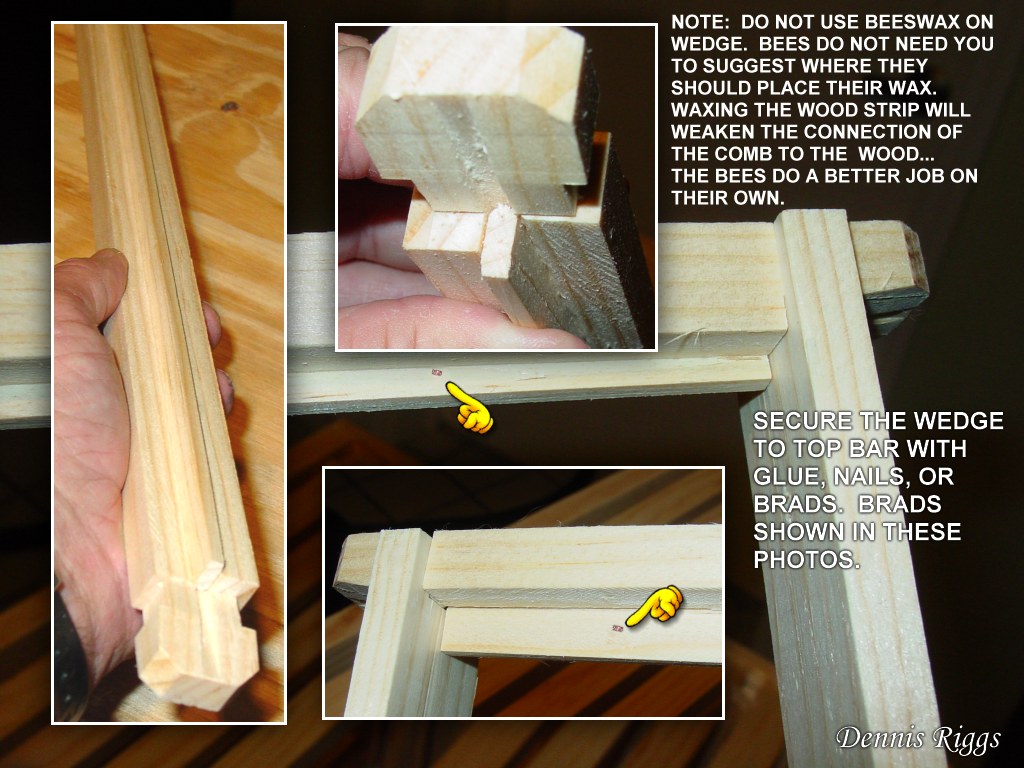
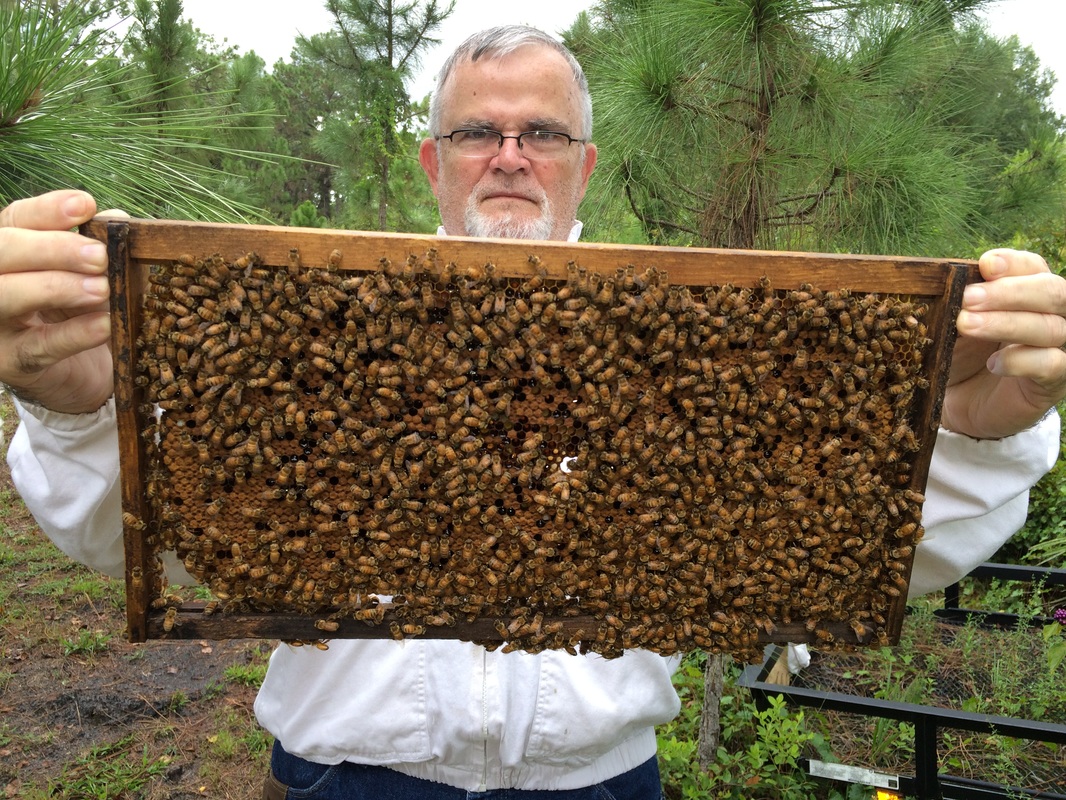
As part of the Florida State Beekeepers (FSBA) Convention (Amelia Island, FL), we were given a tour of Executive Sheve, Daven Wardynski's bees and hydroponics (fish farm and organic sprouts). During our stay and cocktail receptions, we were treated to many first class dishes prepared with the honey from the hives on the property. The apiary (above) was in a beautiful secluded area of the property accessed by a small foot bridge, but only a short distance from his "The Sprouting" Project, where he has a fish farm in conjunction with hydroponics for sprouting seeds and growing organic veggies served at the resort. My wife, Virginia (below) stands at one of the two fish farm tanks inside the greenhouse. I was called to remove a swarm from high in a tree. They had not yet moved into tree and I was able to capture and confine the queen. The captured queen was used to capture the entire swarm. However, this post is not about the removal, but more about the homemade candy, caging, and marking success of the bee removal. I am trying a new "simple" candy recipe to see how it works. I pulverized sugar in a coffee grinder, mixed the pulverized sugar with powdered sugar and honey until it got thick enough to not slump or ooze. Click for RECIPE. After caging and marking her, I reintroduced her to the swarm, to prevent the swarm from leaving for a few days. Below is a short video clip of the colony getting their queen back. Why Foundationless? It is more natural. It lets the bees decide what cell size to make without any man made stamped blueprint (as if bees need a guide). It gets you away from plastic (bees seem to resist plastic) and away from recycled purchased wax foundation. Wax foundation almost always contains contamination, since it is recycled bee's wax (contaminates from hive chemicals, medications, toxins, get absorbed by wax). Letting the bees build their own cells results in a "natural" cell size which is smaller (4.7mm) than standard (5.4mm) purchased printed/embossed foundations. Even if you purchase "small cell" foundation, it will still only be 4.9mm. Bush Bees explains the implications that "natural cell size" had on beekeeping and Varroa mite stabilization which may help you become "treatment free". How to do it? The simplest method for me is using the breakaway bar of wedge top bar frames. Whatever starter strip method you use (Popsicle sticks, 90-degree corner molding, cut-up foundation strips, etc.)... just make sure not to be tempted to wast your time and coat, pour, or rub wax onto the starter strip. It serves no purpose and may even result in a weaker connection than just letting the bees do it. What do the bees think... do they like it? See for yourself. Below is one of many filled out frames by my bees. Notice that they strongly attach at key points and allow the hive to be inspected like a standard hive with foundation, without a lot of fear of breaking off the comb during an inspection. Also notice that the bees make their own communication holes and voids as they feel they need... where they want them. These bees, as with all my current colonies, are treatment free. Very enjoyable doing beekeeping more naturally.
This is intentionally a very short post. I don't have time to go into all the benefits of foundationless beekeeping and what it can do for you; however, if you would like much more information, visit my favorite resource for natural beekeeping Bush Farms Bees (Michael Bush). |
Dennis RiggsRegistered FL Beekeeper and Live Bee Removal specialist, Natural, Treatment Free, Alva, FL Archives
May 2022
Categories |
||||||||||||||||




 RSS Feed